Docker Redis Sentinel
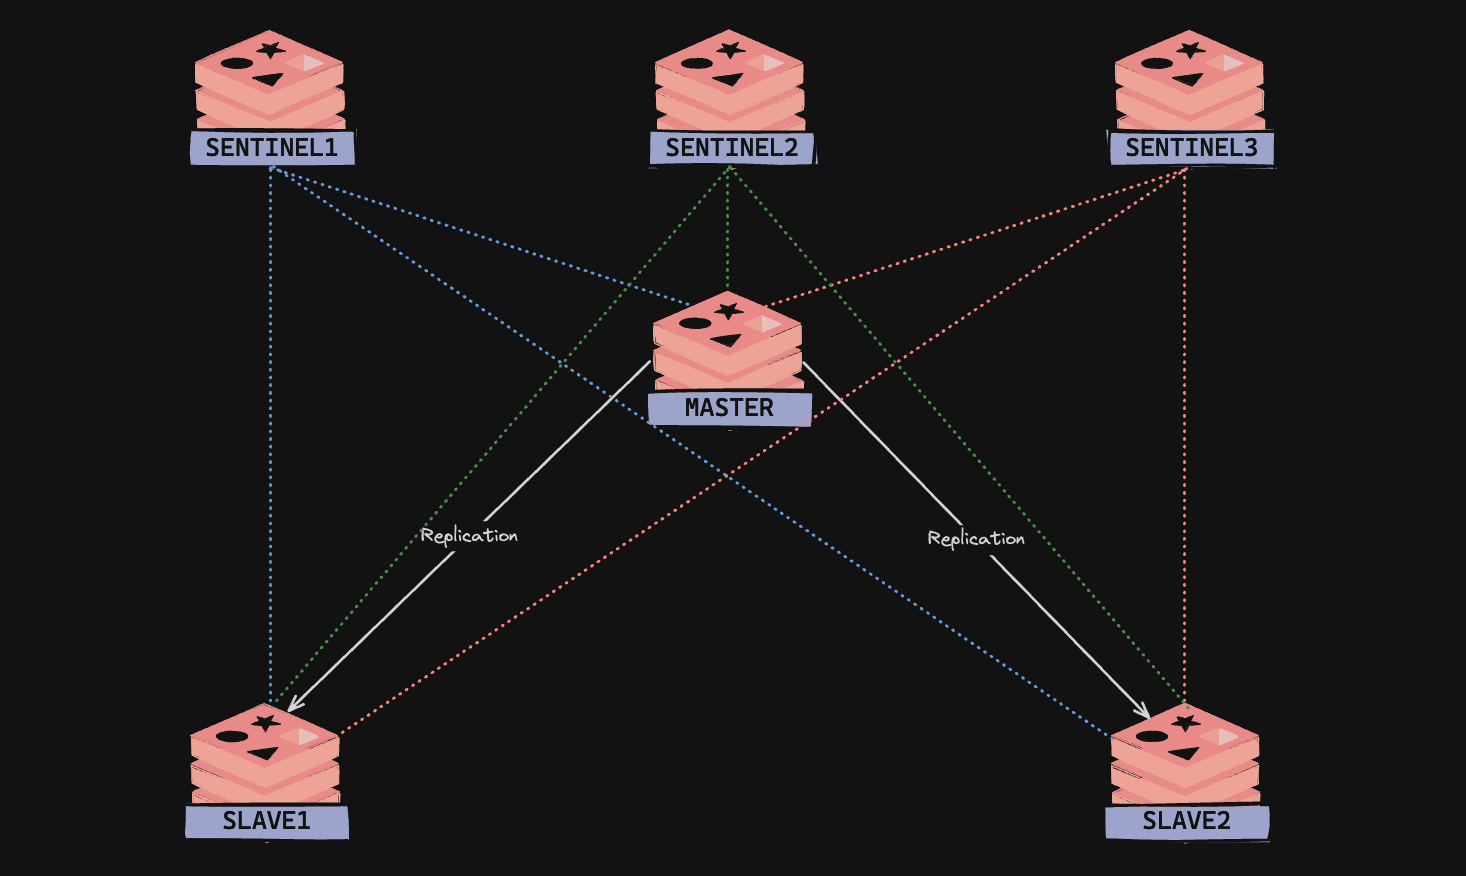
해당 포스팅에서는 Redis 서버 3대와 Sentinel 3대를 이용하여 인프라를 구성합니다.
- Master 1대, Slave 2대 (AOF & RDB)
- Sentinel 3대 (Sentinel Notification)
File Structure
실습에 필요한 폴더 구조입니다. redis 폴더에서 chmod -R 0777 . 로 파일 쓰기 권한을 줘야 합니다.
infrastructure
└── redis
	├── .env
	├── docker-compose.yml
	├── nodes
	│   ├── master
	│   │   ├── data
	│   │   └── init
	│   │       ├── init.sh
	│   │       └── redis.conf
	│   ├── slave-1
	│   │   ├── data
	│   │   └── init
	│   │       ├── init.sh
	│   │       └── redis.conf
	│   └── slave-2
	│       ├── data
	│       └── init
	│           ├── init.sh
	│           └── redis.conf
	└── sentinels
	    ├── sentinel-1
	    │   └── init
	    │       ├── failover.sh
	    │       ├── init.sh
	    │       └── sentinel.conf
	    ├── sentinel-2
	    │   └── init
	    │       ├── failover.sh
	    │       ├── init.sh
	    │       └── sentinel.conf
	    └── sentinel-3
	        └── init
	            ├── failover.sh
	            ├── init.sh
	            └── sentinel.conf
.env
.env 파일에 본인 호스트 IP를 환경변수로 작성합니다. docker-compose.yml 에서 해당 환경변수를 이용합니다.
HOST_IP=192.168.219.74Docker Compose
실습용 docker-compose.yml 스크립트입니다.
- 원래는 도커 기본 네트워크만 사용해도 컨테이너 간 통신에는 문제가 없습니다.
- 하지만 이번 구성에서는 각 노드에 고정 IP를 할당해야 하므로, 별도의 브리지 네트워크(
redis-net)를 정의했습니다. 주의: 스프링에서 Sentinel에게 마스터 주소를 조회하면, 기본적으로 도커 내부 IP를 반환합니다.- 이 경우 스프링 애플리케이션이 마스터 노드와 연결할 수 없게 됩니다.
- 따라서 모든 노드는 반드시
replica-announce-ip,replica-announce-port,sentinel announce-ip,sentinel announce-port등을 설정하여, 외부(호스트)에서도 직접 접근할 수 있도록 구성해야 합니다. - 만약 이 설정을 생략하면, Spring은 도커 내부 IP를 받아오기 때문에 마스터 연결에 실패합니다.
networks:
  redis-net:
    name: redis-net
    driver: bridge
    ipam:
      config:
        - subnet: 172.25.0.0/16

services:
  redis-master:
    image: redis:latest
    container_name: "redis-master"
    command: [ "sh", "-c", "chmod +x /usr/local/etc/init.sh && /usr/local/etc/init.sh ${HOST_IP}" ]
    ports:
      - "6379:6379"
    volumes:
      - ./nodes/master/init:/usr/local/etc
      - ./nodes/master/data:/data
    env_file:
      - .env
    networks:
      redis-net:
        ipv4_address: 172.25.0.2

  redis-slave-1:
    image: redis:latest
    container_name: "redis-slave1"
    command: [ "sh", "-c", "chmod +x /usr/local/etc/init.sh && /usr/local/etc/init.sh ${HOST_IP}" ]
    ports:
      - "6380:6379"
    links:
      - redis-master
    volumes:
      - ./nodes/slave-1/init:/usr/local/etc
      - ./nodes/slave-1/data:/data
    env_file:
      - .env
    networks:
      redis-net:
        ipv4_address: 172.25.0.3

  redis-slave-2:
    image: redis:latest
    container_name: "redis-slave2"
    command: [ "sh", "-c", "chmod +x /usr/local/etc/init.sh && /usr/local/etc/init.sh ${HOST_IP}" ]
    ports:
      - "6381:6379"
    links:
      - redis-master
    volumes:
      - ./nodes/slave-2/init:/usr/local/etc
      - ./nodes/slave-2/data:/data
    env_file:
      - .env
    networks:
      redis-net:
        ipv4_address: 172.25.0.4

  sentinel-1:
    image: redis:latest
    container_name: "sentinel1"
    command: [ "sh", "-c", "chmod +x /usr/local/etc/init.sh && /usr/local/etc/init.sh ${HOST_IP}" ]
    ports:
      - "5001:26379"
    depends_on:
      - redis-master
      - redis-slave-1
      - redis-slave-2
    volumes:
      - ./sentinels/sentinel-1/init:/usr/local/etc
    env_file:
      - .env
    networks:
      redis-net:
        ipv4_address: 172.25.0.5

  sentinel-2:
    image: redis:latest
    container_name: "sentinel2"
    command: [ "sh", "-c", "chmod +x /usr/local/etc/init.sh && /usr/local/etc/init.sh ${HOST_IP}" ]
    ports:
      - "5002:26379"
    depends_on:
      - redis-master
      - redis-slave-1
      - redis-slave-2
    volumes:
      - ./sentinels/sentinel-2/init:/usr/local/etc
    env_file:
      - .env
    networks:
      redis-net:
        ipv4_address: 172.25.0.6

  sentinel-3:
    image: redis:latest
    container_name: "sentinel3"
    command: [ "sh", "-c", "chmod +x /usr/local/etc/init.sh && /usr/local/etc/init.sh ${HOST_IP}" ]
    ports:
      - "5003:26379"
    depends_on:
      - redis-master
      - redis-slave-1
      - redis-slave-2
    volumes:
      - ./sentinels/sentinel-3/init:/usr/local/etc
    env_file:
      - .env
    networks:
      redis-net:
        ipv4_address: 172.25.0.7
Nodes
Master
Master 노드는 Redis의 Persistence 기능을 모두 활성화하여 데이터를 안전하게 디스크에 저장합니다. 즉, RDB와 AOF 방식을 동시에 사용합니다. 또한 replica-announce-ip와 replica-announce-port를 지정하여 슬레이브와 Sentinel이 컨테이너 내부 IP가 아닌 호스트 IP와 포트를 통해 접근할 수 있도록 합니다.
- port: 6379
- bind: 0.0.0.0 (외부 접속 허용)
- replica-announce-ip / replica-announce-port: 외부에서 접근 가능한 호스트 IP와 포트 (Docker Expose Port)
- Persistence 설정
- RDB 스냅샷: 900초마다 1개 변경, 300초마다 10개 변경, 60초마다 10000개 변경
- AOF: appendonly 모드 활성화, 매초 디스크에 기록 (
appendfsync everysec)
- 기타: BGSAVE 오류가 발생하더라도 쓰기를 중지하지 않음 (
stop-writes-on-bgsave-error no)
이 설정을 통해 Master는 안정적으로 데이터를 저장하며, 동시에 슬레이브 및 Sentinel이 올바르게 연결될 수 있습니다.
./nodes/master/init/redis.conf
port 6379
bind 0.0.0.0
protected-mode no
replica-announce-ip 192.168.219.74
replica-announce-port 6379

dir /data
dbfilename backup.rdb
save 900 1
save 300 10
save 60 10000
stop-writes-on-bgsave-error no

appendonly yes
appendfilename appendonly.aof
appendfsync everysec
./nodes/master/init/init.sh 스크립트는 Master Redis 컨테이너 실행 전에 환경변수 적용 및 설정 파일 준비를 담당합니다.
- 환경 변수 설정
HOST_IP=$1: 외부에서 접근 가능한 Master IP를 첫 번째 인자로 받아옵니다.
- redis.conf 수정
replica-announce-ip값을${HOST_IP}로 치환하여 슬레이브와 Sentinel이 올바른 외부 IP로 연결할 수 있도록 합니다.
- 설정 파일 복사
- 수정된
redis.conf를/data/redis.conf로 복사하여 실제 실행에 사용할 수 있도록 합니다.
- 수정된
- Redis Master 실행
redis-server /data/redis.conf명령어를 실행하여 Master를 시작합니다.
이 스크립트 덕분에 컨테이너 내부 IP와 상관없이 항상 외부 접근용 IP가 Master 설정에 반영됩니다.
./nodes/master/init/init.sh
#!/bin/bash

# Config Environment
HOST_IP=$1

# Config Master redis.conf
sed -E -i "s/^(replica-announce-ip[[:space:]]+).*/\\1${HOST_IP}/" /usr/local/etc/redis.conf &&
cp /usr/local/etc/redis.conf /data/redis.conf &&

# Execute Redis Master
redis-server /data/redis.conf
Slave1
Slave1 노드는 Master 데이터를 복제(replication) 받는 기능을 제외하면 Master와 거의 동일하게 동작합니다.
- 차이점은
replicaof 192.168.219.74 6379옵션뿐입니다.- 이 옵션은 Slave가 Master(192.168.219.74:6379)의 데이터를 복제하도록 지정합니다.
- 나머지 설정(
port,bind,protected-mode, persistence, AOF, RDB, 에러 처리 등)은 Master 노드와 동일합니다.
./nodes/slave-1/init/redis.conf
port 6379
bind 0.0.0.0
protected-mode no
replicaof 192.168.219.74 6379
replica-announce-ip 192.168.219.74
replica-announce-port 6380

dir /data
dbfilename backup.rdb
save 900 1
save 300 10
save 60 10000
stop-writes-on-bgsave-error no

appendonly yes
appendfilename appendonly.aof
appendfsync everysec
./nodes/slave-1/init/init.sh 스크립트는 Slave1 노드가 실행될 때 설정을 환경에 맞게 수정하고 Redis 서버를 기동합니다.
- 환경 변수 설정: 컨테이너 실행 시 전달된 호스트 IP를
HOST_IP=$1로 저장합니다. - Redis 설정 수정:
replicaof항목을 수정하여 어떤 Master를 복제할지 지정합니다.replica-announce-ip항목을 수정하여 Sentinel이나 다른 노드가 이 Slave에 접근할 때 사용할 IP를 지정합니다.
- 설정 파일 복사: 수정된 설정 파일을
/data/redis.conf에 저장합니다. - Redis Slave 실행:
redis-server /data/redis.conf명령으로 Redis 서버를 실행합니다.
./nodes/slave-1/init/init.sh
#!/bin/bash

# Config Environment
HOST_IP=$1

# Config Slave redis.conf
sed -E -i -e "s/^(replicaof[[:space:]]+)[^[:space:]]+/\\1${HOST_IP}/" -e "s/^(replica-announce-ip[[:space:]]+).*/\\1${HOST_IP}/" /usr/local/etc/redis.conf &&
cp /usr/local/etc/redis.conf /data/redis.conf &&

# Execute Redis Slave
redis-server /data/redis.conf
Slave2
Slave2 노드는 Slave1과 동일한 방식으로 Master를 복제하지만, replica-announce-port 값만 다릅니다.
./nodes/slave-2/init/redis.conf
port 6379
bind 0.0.0.0
protected-mode no
replicaof 192.168.219.74 6379
replica-announce-ip 192.168.219.74
replica-announce-port 6381

dir /data
dbfilename backup.rdb
save 900 1
save 300 10
save 60 10000
stop-writes-on-bgsave-error no

appendonly yes
appendfilename appendonly.aof
appendfsync everysec

appendonly yes
init.sh 스크립트는 Slave1과 완전히 동일합니다.
./nodes/slave-2/init/init.sh
#!/bin/bash

# Config Environment
HOST_IP=$1

# Config Slave redis.conf
sed -E -i -e "s/^(replicaof[[:space:]]+)[^[:space:]]+/\\1${HOST_IP}/" -e "s/^(replica-announce-ip[[:space:]]+).*/\\1${HOST_IP}/" /usr/local/etc/redis.conf &&
cp /usr/local/etc/redis.conf /data/redis.conf &&

# Execute Redis Slave
redis-server /data/redis.conf
Sentinels
./sentinels/sentinel-N/init/failover.sh 스크립트는 Sentinel이 failover 이벤트를 감지했을 때 호출되는 스크립트입니다. 모든 센티널에 추가해야 할 파일입니다.
- 입력 파라미터
$1: 이벤트 타입 (+failover-end등)$2: 마스터 이름$3: 이전 마스터 IP$4: 이전 마스터 포트$5: 새로운 마스터 IP$6: 새로운 마스터 포트
- 작동 방식
- 이벤트 타입이
+failover-end인 경우, 콘솔에 이벤트 발생 메시지를 출력합니다. curl을 통해 외부 시스템(예:HOST_IP:8080/test)에 failover 발생 사실을 알립니다.- 알림을 마친 후 스크립트를 종료합니다.
- 이벤트 타입이
./sentinels/sentinel-N/init/failover.sh
#!/bin/bash
# $1: Event Type (+failover-end)
# $2: Master Name
# $3: Previous Master IP
# $4: Previous Master PORT
# $5: New Master IP
# $6: New Master PORT

if [ "$1" == "+failover-end" ]; then
    echo '+failover-end EventListener Invoked'
    curl -s 192.168.219.74:8080/test > /dev/null 2>&1
    exit 0
fi
./sentinels/sentinel-N/init/init.sh 스크립트는 Redis Sentinel을 실행하고 환경 설정을 반영하는 초기화 스크립트입니다. 마찬가지로 모든 센티널에 추가해야할 파일입니다.
HOST_IP환경변수를 전달받습니다.- Sentinel 알림용
curl을 백그라운드에서 설치합니다. - failover 스크립트(
failover.sh)에 실행 권한을 부여하고,curl호출 주소를 전달받은HOST_IP로 동적으로 변경합니다. sentinel.conf파일 내 Master IP와announce-ip를 전달받은HOST_IP로 수정합니다.- 수정한
sentinel.conf를/etc/redis/sentinel.conf로 복사합니다. redis-sentinel /etc/redis/sentinel.conf명령으로 Sentinel을 실행합니다.
./sentinels/sentinel-N/init/init.sh
#!/bin/bash

# Config Environment
HOST_IP=$1

# Download CURL in Background for Sentinel Notification
(apt-get update && apt-get install -y curl) &

# Config failover script
chmod +x /usr/local/etc/failover.sh &&
sed -E -i -e "s#(curl -s )[^:]+#\1${HOST_IP}#" /usr/local/etc/failover.sh &&

# Config sentinel.conf
sed -E -i -e "s/^(sentinel monitor mymaster[[:space:]]+)[^[:space:]]+/\1${HOST_IP}/" -e "s/^(sentinel announce-ip[[:space:]]+).*/\\1${HOST_IP}/" /usr/local/etc/sentinel.conf &&
mkdir -p /etc/redis && cat /usr/local/etc/sentinel.conf > /etc/redis/sentinel.conf &&

# Execute Redis Sentinel
redis-sentinel /etc/redis/sentinel.conf
Sentinel1
- port 26379
- Sentinel이 내부적으로 사용하는 기본 포트입니다. 이 포트를 통해 Sentinel끼리 통신하거나 클러스터 내부 상태를 공유합니다.
- dir “/tmp”
- Sentinel이 임시 데이터를 저장할 디렉토리를 지정합니다.
- sentinel resolve-hostnames yes
- 호스트명을 IP로 변환하여 사용할 수 있도록 설정합니다.
- sentinel monitor mymaster 192.168.219.74 6379 2
- Sentinel이 모니터링할 마스터 노드를 지정합니다.
192.168.219.74:6379가 현재 마스터 주소이며,2는 quorum(장애 판단 시 필요한 Sentinel 수)입니다.
- sentinel down-after-milliseconds mymaster 5000
- 마스터가 응답하지 않으면 5초 후 장애로 판단합니다.
- sentinel failover-timeout mymaster 500
- failover 시도에 대한 타임아웃을 설정합니다.
- sentinel announce-ip 192.168.219.74
- Sentinel이 외부 클라이언트에게 자신을 알릴 때 사용할 IP입니다.
매우 중요: 컨테이너 내부가 아닌 외부에서 접근 가능한 호스트 IP로 설정해야 합니다.
- sentinel announce-port 5001
- Sentinel이 외부와 통신할 수 있는 포트입니다. (Docker Expose Port)
매우 중요: 클라이언트가 Sentinel을 통해 마스터 정보를 조회할 때, 이 포트를 통해 접근하게 됩니다.
- bind 0.0.0.0
- 모든 네트워크 인터페이스에서 접속을 허용합니다.
- sentinel notification-script mymaster /usr/local/etc/failover.sh
- failover 이벤트 발생 시 실행할 알림 스크립트를 지정합니다.
./sentinels/sentinel-1/init/sentinel.conf
port 26379
dir "/tmp"
sentinel resolve-hostnames yes
sentinel monitor mymaster 192.168.219.74 6379 2
sentinel down-after-milliseconds mymaster 5000
sentinel failover-timeout mymaster 500

sentinel announce-ip 192.168.219.74
sentinel announce-port 5001

bind 0.0.0.0

sentinel notification-script mymaster /usr/local/etc/failover.sh
Sentinel2
Sentinel2는 Sentinel1과 동일하게 동작하지만, sentinel announce-ip와 sentinel announce-port 값만 다릅니다.
- sentinel announce-ip: 호스트 IP
- sentinel announce-port: 외부와 통신할 수 있는 포트 (Docker Expose Port)
./sentinels/sentinel-2/init/sentinel.conf
port 26379
dir "/tmp"
sentinel resolve-hostnames yes
sentinel monitor mymaster 192.168.219.74 6379 2
sentinel down-after-milliseconds mymaster 5000
sentinel failover-timeout mymaster 500

sentinel announce-ip 192.168.219.74
sentinel announce-port 5002

bind 0.0.0.0

sentinel notification-script mymaster /usr/local/etc/failover.sh
Sentinel3
Sentinel3 역시 Sentinel1과 동일하게 동작하며, sentinel announce-ip와 sentinel announce-port만 다릅니다.
- sentinel announce-ip: 호스트 IP
- sentinel announce-port: 외부와 통신할 수 있는 포트 (Docker Expose Port)
./sentinels/sentinel-3/init/sentinel.conf
port 26379
dir "/tmp"
sentinel resolve-hostnames yes
sentinel monitor mymaster 192.168.219.74 6379 2
sentinel down-after-milliseconds mymaster 5000
sentinel failover-timeout mymaster 500

sentinel announce-ip 192.168.219.74
sentinel announce-port 5003

bind 0.0.0.0

sentinel notification-script mymaster /usr/local/etc/failover.sh
More Information
Reference
Sentinel, Docker, NAT and possible issues
Redis Sentinel vs Redis Cluster: 고가용성과 확장성의 대결
Redis 장애시 RDBMS의 연쇄적인 장애에 대응하기 위한 전략
Redis HA(High availability)와 Sentinel
Failover Using Sentinel for Redis
RedisGate:Redis SENTINEL ANNOUNCE-IP, ANNOUNCE-PORT
RedisGate:Redis SENTINEL NOTIFICATION-SCRIPT Parameter
Sentinel was not able to save the new configuration on disk:Device or resource busy