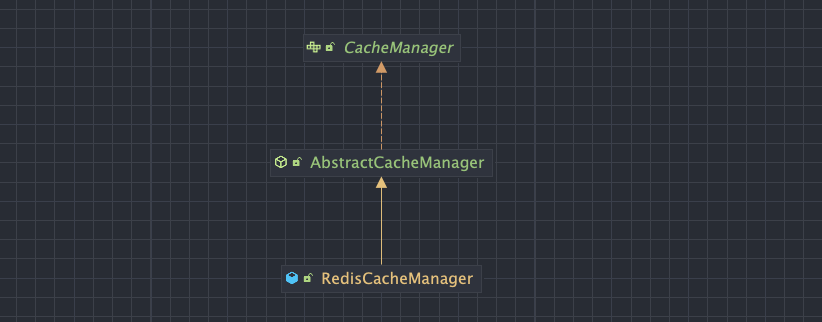
RedisCacheManager
RedisCacheManager 는 스프링에서 기본으로 제공하는 CacheManager 의 구현체 중 하나이며. spring-data-redis 의존성을 추가하면 자동으로 추가되는 클래스입니다.
RedisCacheManager 는 CacheManager 타입의 Bean이 직접 구현되어 있지 않으면, Spring Boot의 자동 설정(AutoConfiguration) 기능을 통해 자동으로 등록됩니다.
보다 정확한 프로세스는 다음과 같습니다.
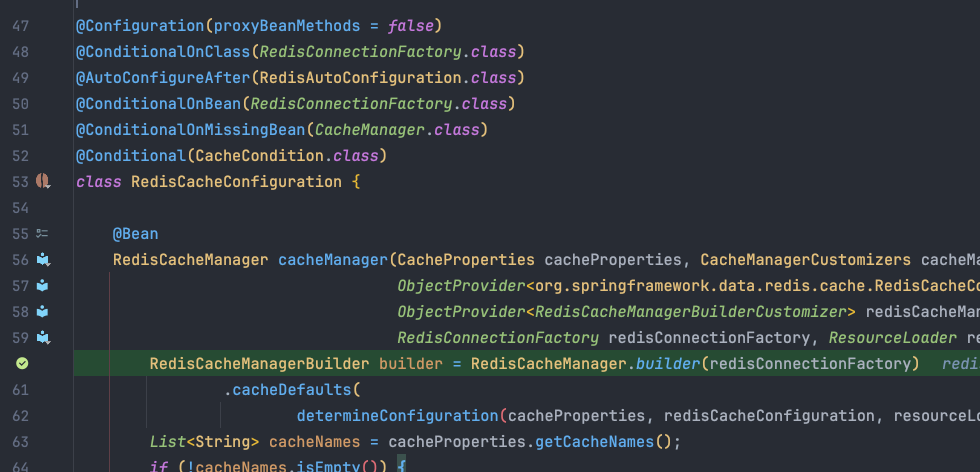
- Spring Data Redis의 자동 설정 클래스인
org.springframework.boot.autoconfigure.data.redis.RedisAutoConfiguration이 로드됩니다. - 1번에서 로드된
RedisAutoConfiguration에 의해org.springframework.boot.autoconfigure.cache.RedisCacheConfiguration이 호출됩니다. - 애플리케이션 내에
CacheManager타입의 Bean이 존재하지 않으면,RedisCacheManager가 기본적으로 등록됩니다.
RedisCacheConfiguration
org.springframework.data.redis.cache.RedisCacheConfiguration 는 RedisCache 의 캐시 설정을 정의하는 클래스입니다. 앞서 소개한 RedisCacheManager 는 내부적으로 RedisCacheConfiguration 의 Default 값을 사용합니다.
앞서 RedisCacheManager 에서 언급된 RedisCacheConfiguration 는 Spring Boot 소속이며, 지금 언급된 RedisCacheConfiguration 는 Spring Data Redis 소속입니다. 혼동하면 안됩니다.
Cache
RedisCache 는 Redis 를 기반으로 캐시 데이터를 저장하는 Cache 의 구현체입니다. (Cache 는 Spring 에서 지원합니다)
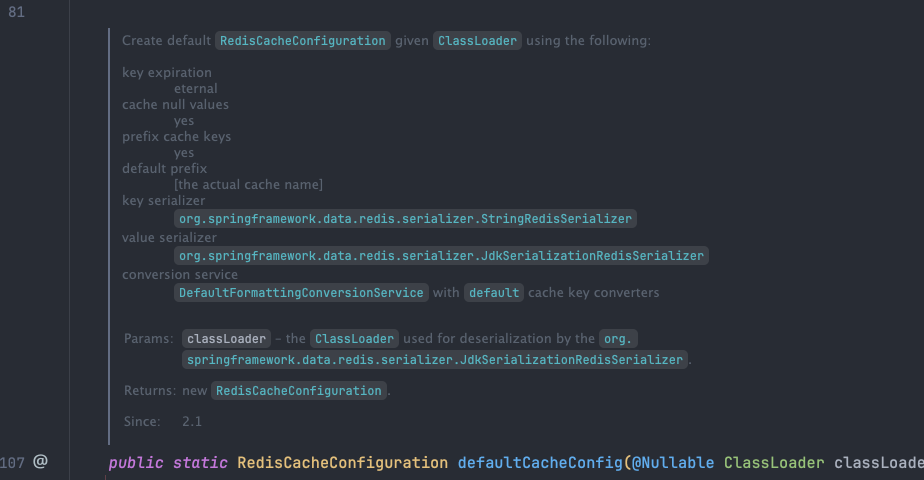
RedisCacheConfiguration 으로 가능한 설정과 Default 설정은 다음과 같습니다.
- null 값 캐싱 여부 (Default : YES)
- 저장될 Key 의 Prefix 설정 여부 (Default : YES)
- Redis 에 저장될 Key 의 Prefix 를 설정 (Default : 실제 저장될 Key 의 이름 ==
cacheName 가 prefix 로 사용됩니다.. prefix 가 별도로 설정되면 prefix 를 사용합니다. ) - TTL 설정 : 캐시 데이터의 만료시간 설정 (Default : 무한정)
- Key Serializer : Key 를 저장할 때 어떤 포맷으로 저장할지 설정 (Default : StringRedisSerializer)
- Value Serializer : Value 를 직렬화할 방식을 설정 (Default : JdkSerializationRedisSerializer)
기본 RedisCacheManager
RedisCacheManager 를 이용한 캐싱은 Spring 에서 제공하는 @Cacheable 사용법과 동일합니다.
@Cachable, @CacheEvict, @Caching 모두 역할만 다를 뿐 사용법은 동일합니다.
@Cacheable(cacheNames = "crew-statistic", key = "'crew:' + #crewId")
@Override
public CrewStatisticDomainDto getStatisticById(Long crewId) {
    return crewStatisticQueryDslRepository.getStatisticById(crewId);
}
데이터가 잘 캐싱되는 것을 확인할 수 있습니다.
127.0.0.1:6379> keys *
1) "crew-statistic::crew:1"
127.0.0.1:6379> get "crew-statistic::crew:1"
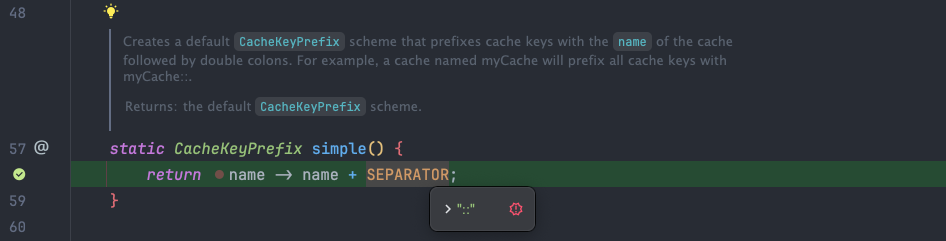
"\xac\xed\x00\x05sr\x007revi1337.onsquad.crew.domain.dto.CrewStatisticDomainDto\x00\x00\x00\x00\x00\x00\x00\x00\x02\x00\x03J\x00\tmemberCntJ\x00\nrequestCntJ\x00\bsquadCntxp\x00\x00\x00\x00\x00\x00\x00\x05\x00\x00\x00\x00\x00\x00\x00\x00\x00\x00\x00\x00\x00\x00\x00\x02"Redis 에 저장되는 Key 는 내부적으로 name + SEPARATOR 의 결과에 + key 로 만들어 집니다. crew-statistic::crew:1 의 각 부분은 다음과 같습니다.
crew-statistic: @Cacheable 에 명시한 cacheName (name)::: Separator. CacheKeyPrefix 에 선언되어 있으며 디폴트 구분자가 :: 입니다. (SEPARATOR)crew:1: @Cacheable 에 명시한 key
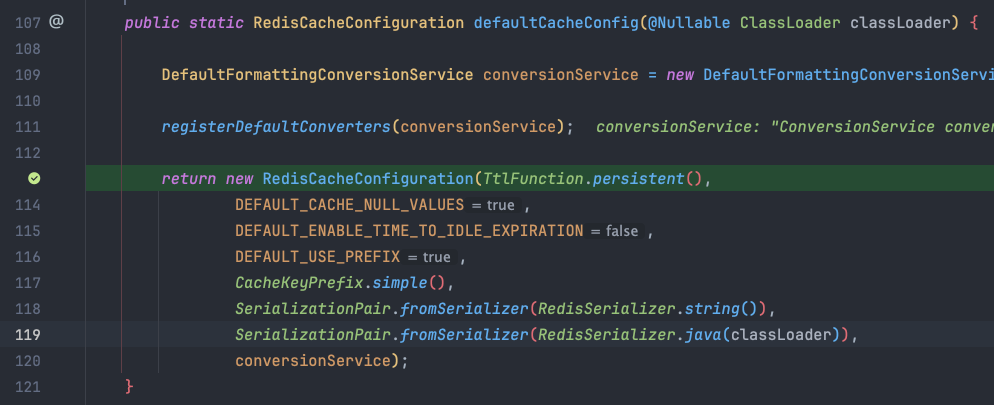
실제로 RedisCacheConfiguration 을 Default 설정에는 CacheKeyPrefix.simple() 를 호출하는데
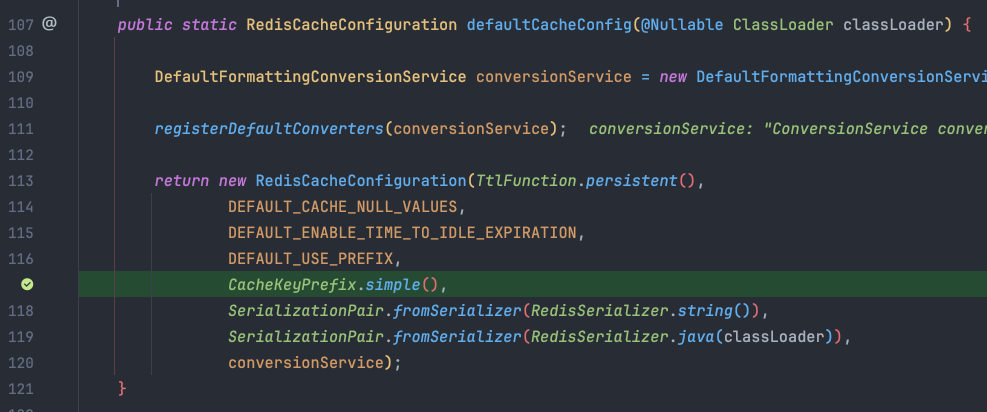
CacheKeyPrefix.simple() 은 prefix 를 사용하지 않고, cacheName 을 prefix 로 사용하는 전략을 사용하게 됩니다. 그리고 이 SEPARATOR 가 :: 인 것을 확인할 수 있습니다.
Custom RedisCacheManager
앞에 결과처럼 Key 중간에 이상한 :: 라는 문자가 포함되어 있는 것을 볼 수 있었습니다. 하지만 저는 일관성 있게 : 문자 하나로 구분자를 사용하고 싶고, Key 앞에 Prefix 로 현재 프로젝트의 이름을 디폴트로 설정해주고 싶습니다. 그리고 Key 에 TTL 도 걸어주고 싶습니다. 이러한 경우에 RedisCacheManager 를 직접 설정하고 Bean 으로 등록해주면 됩니다.
Configuration
RedisCacheManager 와 RedisCacheConfiguration 는 모두 Builder 형태로 제공됩니다. 따라서 Chaining 형태로 설정할 수 있습니다. RedisCacheConfiguration 를 설정하고 RedisCacheManager 에 등록해주면 됩니다.
RedisCacheConfiguration
- 기본적으로
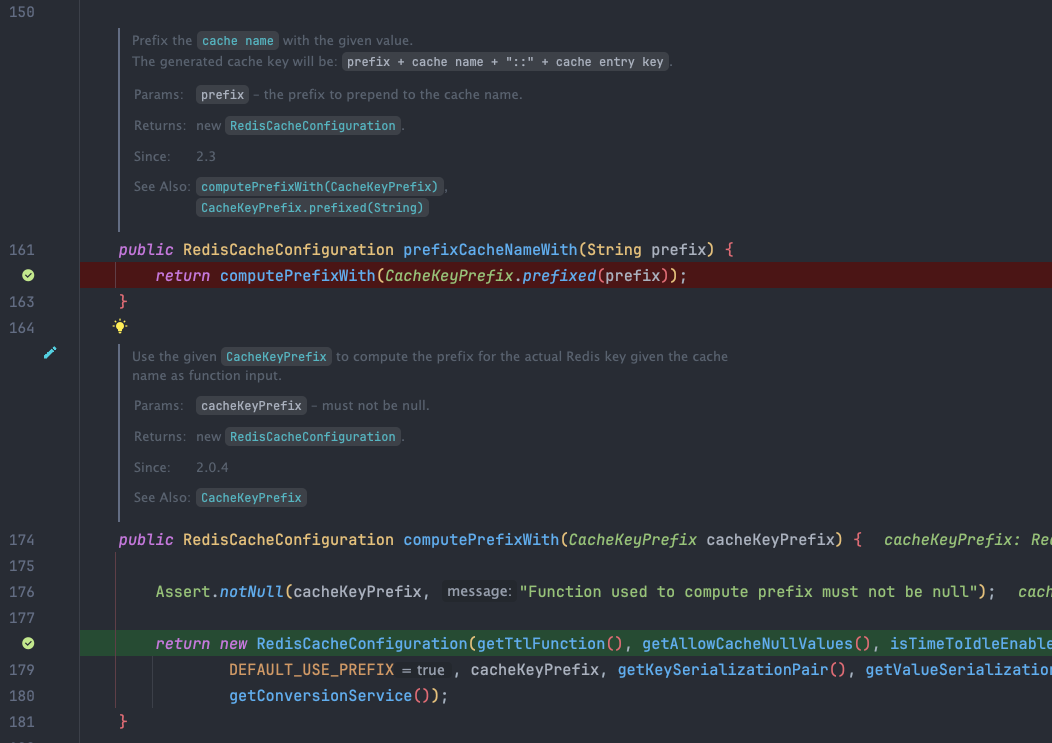
RedisCacheConfiguration.defaultCacheConfig()로 기본설정을 불러옵니다. .computePrefixWith(CacheKeyPrefix)으로prefix와cacheName를 조합한 이름을 반환하도록 설정합니다.CacheKeyPrefix는 하나의 인자를 갖는 Functional Interface로,cacheName이 설정 시 변수로 전달됩니다. 이를 활용하면Prefix와cacheName을 조합한 문자열을 반환하도록 설정할 수 있어, 보다 유연한 Prefix 설정이 가능합니다. 이 방식은 내부적으로CacheKeyPrefix.prefixed를 호출하지 않기 때문에,prefix + name + SEPARATOR형태가 아닌, 원하는 방식으로 Key 를 생성할 수 있습니다.- 그와 달리 만약
.prefixCacheNameWith(String)로 사용하고자하는 Prefix 만 전달하면, 내부적으로CacheKeyPrefix.prefixed가 호출되어 CacheKeyPrefix 안 변수로 선언된::문자가 SEPARATOR 로 사용되어::문자가 추가됩니다.
.serializeKeysWith(fromSerializer(new StringRedisSerializer()))로 Key 직렬화기를 설정합니다..serializeValuesWith(fromSerializer(new GenericJackson2JsonRedisSerializer()));로 Value 직렬화기를 설정합니다. 해당 직렬화기는 Value 를 Human Readable 한 형태로 직렬화합니다. (디폴트 Value 직렬화기는 JdkSerializationRedisSerializer 입니다. 하지만 해당 직렬화기는 Human Readable 하지 않습니다.)
RedisCacheManager
- RedisCacheManager 의
cacheDefaults()에는전역으로 사용하고자하는 RedisCacheConfiguration를 등록합니다. - RedisCacheManager 의
withInitialCacheConfigurations()에는cacheName 별로 사용하고자하는 RedisCacheConfiguration 을 Map 형태로 모아 등록합니다. 해당 설정을 통해 cacheName 별로 만료시간(TTL) 을 다르게 할 수 있습니다.
@EnableCaching
@Configuration
public class RedisCacheManagerConfiguration {

	private static final String DEFAULT_KEY_FORMAT = "onsquad:%s:"; // onsquad: 가 prefix, 뒤에는 cacheName 의 포맷

    @Bean
    public CacheManager redisCacheManager(RedisConnectionFactory redisConnectionFactory) {
        return RedisCacheManager.builder(redisConnectionFactory)
                .cacheDefaults(defaultConfiguration())
                .withInitialCacheConfigurations(initConfiguration())
                .build();
    }

    private Map<String, RedisCacheConfiguration> initConfiguration() {
        return new HashMap<>() {{
            put("crew-statistic", defaultConfiguration().entryTtl(Duration.ofSeconds(10)));  // cacheName 이 crew-statistic 인 데이터는 10 초의 만료시간 설정
        }};
    }

	private RedisCacheConfiguration defaultConfiguration() {
        return RedisCacheConfiguration.defaultCacheConfig()
                 .computePrefixWith(cacheName -> String.format(DEFAULT_KEY_FORMAT, cacheName)) // "onsquad:cacheName:key" 형태로 Redis 에 저장됩니다.
//                .prefixCacheNameWith("onsquad:") // "onsquad:cacheName::key" 형태로 Redis 에 저장됩니다.
                .serializeKeysWith(fromSerializer(new StringRedisSerializer()))
                .serializeValuesWith(fromSerializer(new GenericJackson2JsonRedisSerializer()));
    }
}
자 이제 마찬가지로 이전과 동일한 코드를 작성해주고 요청을 찔러봅니다.
Warn
단, 애플리케이션에 여러개의 CacheManager Bean 이 등록되어 있다면 @Cacheable 의 cacheManager 의 속성에 사용하고자 하는 CacheManager Bean 의 이름을 명시해주어야 합니다.
@Cacheable(cacheNames = "crew-statistic", key = "'crew:' + #crewId")
@Override
public CrewStatisticDomainDto getStatisticById(Long crewId) {
    return crewStatisticQueryDslRepository.getStatisticById(crewId);
}
요청을 찌른 후, 결과가 잘 캐싱된 것을 확인할 수 있고, 12초 후 만료시간이 지나 사라진것을 알 수 있습니다. 또한, Value 를 GenericJackson2JsonRedisSerializer 로 직렬화했기 때문에 Human Readable 해진 것을 알 수 있습니다. 마지막으로 :: 문자가 사용되지 않고 : 하나만 사용되어 일관성을 지키고 있는것을 확인할 수 있습니다.
127.0.0.1:6379> keys *
1) "onsquad:crew-statistic:crew:1"
127.0.0.1:6379> keys *
(empty array)
127.0.0.1:6379> get onsquad:crew-statistic:crew:1
"{\"@class\":\"revi1337.onsquad.crew.domain.dto.CrewStatisticDomainDto\",\"requestCnt\":0,\"squadCnt\":2,\"memberCnt\":5}"
물론 처음에 작성한 설정파일에서 RedisCacheConfiguration.defaultCacheConfig() 를 불러왔기 때문에 CacheKeyPrefix.simple() 를 사용하는 RedisCacheConfiguration 가 만들어지게 됩니다.
하지만 .computePrefixWith(CacheKeyPrefix) 는 .prefixCacheNameWith(String) 와 달리 내부적으로 CacheKeyPrefix.prefixed 를 호출하지 않기 때문에
prefix + name + SEPARATOR 형태의 Key 를 사용하지 않게 됩니다.

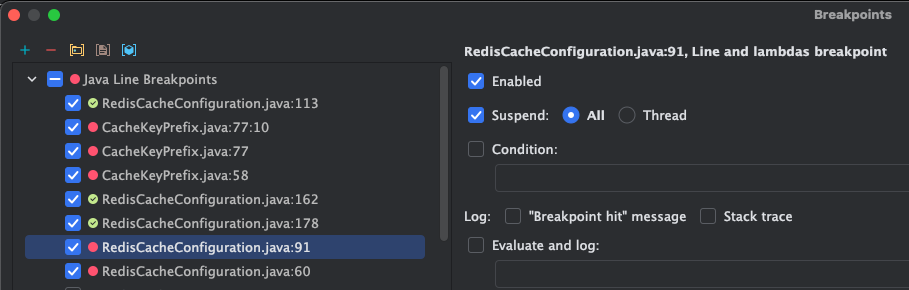
사용된 BreakPoints
포스팅에 사용된 Breakpoint 목록입니다.